
4 Ingredient, NO-Knead Ciabatta Bread Recipe |
The EASIEST Way To Make Ciabatta
Emma Fontanella’s Easiest No-Knead Ciabatta. In the region of Italy where it was created, ciabatta is known as “Il pane con buco” — “the bread with big holes”. You can see why!
About My Easiest No-Knead Homemade Ciabatta Bread Recipe
Ciabatta is one of Italy’s most famous breads. It was conceived in Italy as a sandwich bread (to try to take on the rising popularity of the French baguette). Today it’s become one of the most popular sandwich breads in the world! When making bread, I think kneadless recipes are often the easiest because there’s so little hands-on time and effort required for working the dough, and you don’t need a stand mixer. That’s why I like to make my ciabatta using a no-knead method. Many recipes for ciabatta that I see online get this iconic bread badly wrong. So, let’s make homemade ciabatta the right way, and all without any kneading!
Now, ciabatta is a little trickier to make than some other Italian breads, such as focaccia. So, you might need a bit of practice before you get it perfect! Don’t be discouraged if it doesn’t go quite right on your first attempt, you’ll get it right the next time! My method is designed to be approachable, so if you follow this recipe, before you know it, you’ll find yourself being able to make perfect homemade ciabatta! As well as giving you lots of tips to help you succeed making this bread, I’ll give you a couple ideas for authentic Italian sandwiches you might want to make with your freshly baked ciabatta. Of course, it’s not just for sandwiches, it’s also great for dipping in soups or sauces, and I’ve given you my top 5 favorite ways to use ciabatta later on in the recipe!

A great option for a simple Italian sandwich using Emma’s homemade ciabatta is to use mozzarella, really good fresh tomatoes, and fresh basil. Make sure to season the tomatoes well with salt and pepper, and drizzle with good extra virgin olive oil.
What makes a good, authentic loaf of ciabatta?
My recipe is designed to allow you to make real ciabatta easily at home that’s just like the versions you can buy in the very best artisan bakeries. It’s delicious, and quite unlike other white breads. So, what exactly makes a good ciabatta?
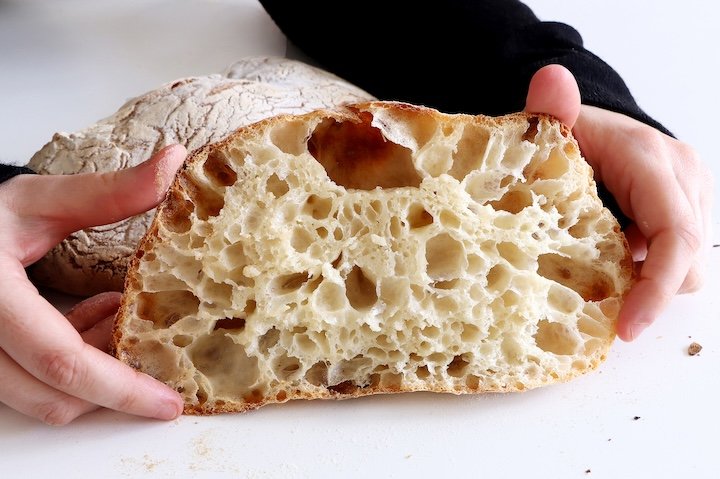
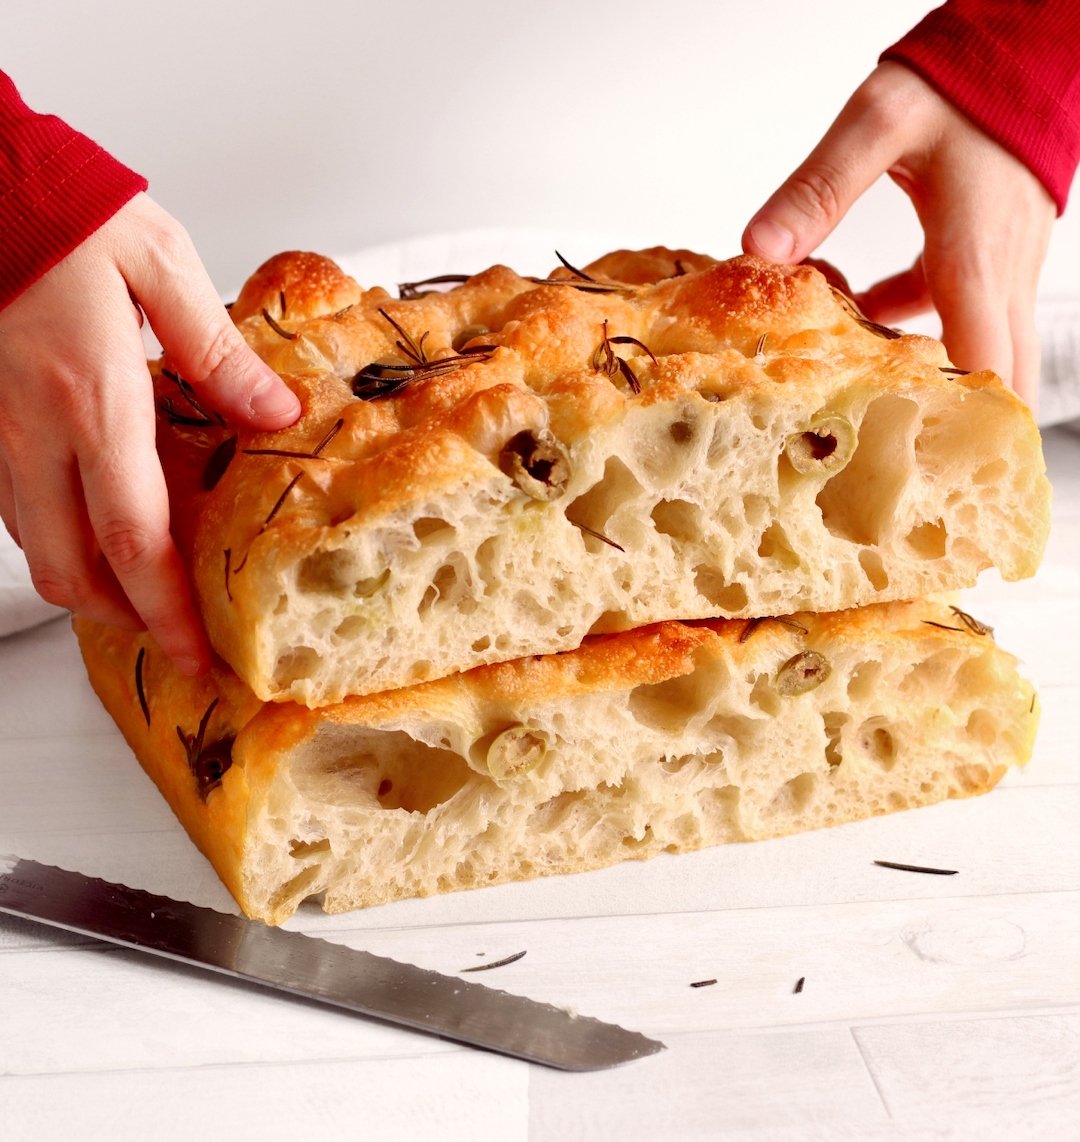
Ciabatta is probably most famous for its irregular, incredibly open crumb (see the photo below). In the town of Adria (which is near Venice in northern Italy) where ciabatta was created, ciabatta is actually known as “Il pane con buco”—the bread with big holes. The bubbles/holes are so big, it makes you wonder how the bread holds itself up during baking. When you taste it, you might even wonder how the crumb can be so soft and delicious, when it looks like there’s almost no crumb there! So then, the interior of good ciabatta should be a thing of beauty—soft, light and seemingly impossibly airy.

An example of the interior of Emma Fontanella’s no-knead ciabatta (the loaf was cut open horizontally). Note the super airy interior, and how irregular the bubbles are. The interior will look different every time you make a loaf of ciabatta e.g., compare this photo to the photo of a different loaf at the top of the page.
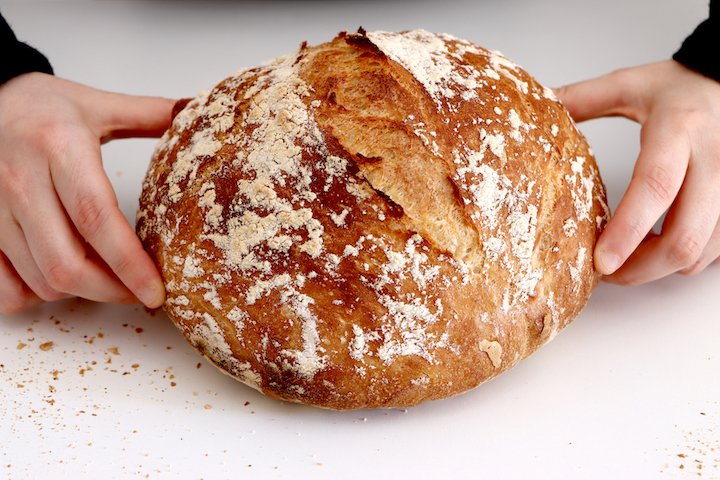
Ciabatta should also have a very particular exterior form (see the photo below). The crust should not be at all smooth. Rather, it should be crispy, crackly, with lines and “stripes” giving a texture resembling tree bark. It should be mahogany in color, be evenly coated with flour, but have absolutely no tears or “ears” like you see in many rustic breads where the crust “bursts open” during baking. If you see recipes for ciabatta, or loaves for sale in bakeries, where the crust looks smooth, has burst open, has no tree bark texture, no flour, or looks pale, walk away! They made it wrong!

The exterior of a loaf of Emma Fontanella’s no-knead ciabatta. Note the tree bark-like lines and 'stripes” in the crispy crust, the floured exterior, and the brown crust. These are all hallmarks of a properly made ciabatta.
Finally, the loaves (both big and small) should be roughly rectangular in shape, and should not be too tall. As you might already know, the word “ciabatta” in Italian means “slipper”. So, this bread needs to be rather flat compared to many loaves—so that it vaguely has the profile of a slipper. The reason for this is obviously not so you can try to fit your foot in it! It’s not actually a slipper! Rather, the idea for ciabatta when it was created originally, was that you should you split it open horizontally to make sandwiches. Hence the need for it to be relatively flat so there’s not too much bread in the sandwich. Obviously, though, you can cut your ciabatta in whichever way you want, and use it however you want!
If you love ciabatta, you might like some of the other breads that feature in my new cookbook, Simple Pleasures. In particular, you might the rustic Italian bread, called pane di Genzano, which while not as famous in name as ciabatta, is famous for being used by top Italian chefs for making bruschetta. I also have an incredible focaccia recipe in the book which is made with mashed potato in the dough to make it extra soft on the inside, and crispy on the outside.
To biga or not to biga…
Commercially, ciabatta is made using a biga (a so-called “preferment”). However, I’ve eliminated this step for my homemade version, and instead used a cold overnight bulk fermentation. (If you’re not sure what any of that means, by the way, don’t worry—it just a fancy way of saying, in this recipe, we put the dough in the fridge overnight!)
Now you could argue that this is not “authentic”, and you’d be right. However, as with a number of things about ciabatta, the decision to specify a biga in the original recipe was not really a culinary decision. Rather, the creators were focussed on making a new, commercial Italian bread to take on the French baguette, which was growing rapidly in popularity in Italy at the time.
(As an aside, this is actually quite surprising when you think about it—that Italians were preferring a French bread over Italian breads! Italians are famous for believing, no not believing, knowing that Italian food is always the best! I can see both sides here, though... but then I’m half French—my mom is French and my dad is Italian! I love French breads!)
Anyway, as the creators of ciabatta were thinking about the recipe for their new bread, they compared absolutely everything they did to a baguette. In France, good baguettes are made commercially using a poolish (a type of preferment). So, the creators of ciabatta decided they wanted to use a preferment too, but an Italian one! It Italy, a common type of preferment is a biga. So they chose to specify a biga.
However, as a chef, when designing recipes, I’m all about flavor and texture! Quite honestly, I think ciabatta is even more delicious made the way I suggest—by using a cold, long, overnight bulk fermentation, rather than using a small amount of biga and a short, room temperature bulk fermentation like we’d use in a bakery.
Besides, my way, it’s less hassle and there are fewer dirty bowls to wash up! I don’t know about you, but in my house, when I dirty a bowl, it’s me that has to clean the thing up! So, when baking at home, fewer dirty bowls is always a winning idea with me!
What kind of flour should I use for ciabatta?
Now there’s a question! I’ll give you a short answer, then a longer answer! First, let me tell you what I use, and why. For ciabatta, I use a high protein Italian Type 00 flour called “Garofalo W 350 Type 00”. The reason is that this particular flour has a particularly high quality gluten content that will stand up to long fermentations (up to 48 hours). It also absorbs water well. We want for both these characteristics for our homemade ciabatta.

The flour Emma Fontanella uses for homemade ciabatta — Garofalo W 350 Type 00.
It’s a great flour for using with long fermentations, and I highly recommend it. However, don’t feel the need to search it out. Any good strong bread flour will work well in this recipe. I’d recommend you go for a bread flour with around 13% protein content, but a strong all-purpose flour would also work.
Now, for the longer answer. Many Italian breads, perhaps even most, have origins dating back hundreds or even thousands of years, to before the days of the Roman Empire. Over the centuries, many different versions of these breads have been developed by bakers. For example, today, there are literally thousands of different and diverse kinds of focaccia made through Italy; there are even hundreds of different variants in single provinces. Ciabatta though, is different.
Ciabata was created less than 50 years ago, in 1982. Right from the start, it was created as a commercial product, with a single, specific, licensed recipe that specified precisely what flours to use. (Shockingly, it specified flours produced by mills owned by the creator of the bread!) Today, the specified flours have changed, and if you wanted to get close replicating that mix at home, you’d need to use a combination of flours made from hard and soft wheats originating in Italy, Canada, the US and Australia.
Today, many bakeries both across Italy and around the world make their own versions of ciabatta, often with pretty poor results. You’d be surprised how many bakeries in Italy produce shockingly bad versions of this amazing bread.
However, in my opinion to make a top quality ciabatta, there is little if any real benefit to developing a complex mix of four or more flours. Remember, the origin of the idea for using such a mix of flours was a commercial decision, not a culinary decision. It was about creating a commercial vehicle for using flours produced in the mills owned by the creator of the ciabatta!
If you want to try something a little bit more authentic than, say, using a strong King Arthur flour (which will give excellent results, by the way), here’s what I would suggest. First, try to find the Garofalo W 350 Type 00 flour that I use (see above). It’s really ideal for ciabatta, in my opinion. If you can’t find that, then I would suggest using a mix of two flours: any high protein Type 00 flour designed for pizza or bread making, along with some Manitoba flour (Manitoba flour is typically made from a Canadian wheat that has high quality gluten). Use a mix of 2 parts Manitoba flour and 1 part high protein Type 00 flour. A mix like that can give stunning results with my recipe.
Phew, well done making it to the end of that section! I bet you wished you’d never asked!
What makes ciabatta different from other bread?
Ciabatta stands out from other breads due to its incredible open, airy texture. The high hydration levels, combined with the method of working the dough, give rise to big, irregular air pockets in the finished bread. Because the dough is so “wet”, you need to use a lot of flour on the surface to prevent it sticking while its proofing. This coating of flour on the wet dough gives rise to the second key characteristic of ciabatta - its rough-textured, tree-bark like, crispy crust.
What are the ingredients in ciabatta bread?
There are many incorrect recipes for ciabatta on the Internet with incorrect ingredient lists. In 1982, when the creator of ciabatta, Arnaldo Cavallari, came up with his recipe, these are the ingredients he used: high gluten flour, water, salt, and yeast. That’s it. Four ingredients. No olive oil. No milk. Nothing else.
Should ciabatta be hard or soft?
Ciabatta should be soft on the inside, and crispy and crunchy on the outside crust. The soft interior crumb is at its best on the day of baking. However, you can refresh day or two old ciabatta by putting it in a hot oven for a few minutes.
My Top 5 Ways To Use Ciabatta
Sandwiches. Ciabatta was designed for use in sandwiches. Split it open horizontally, and add the fillings of your choice.
Grilled Panini. One of the most popular breads for using in grilled, pressed panini is ciabatta. Split the ciabatta open horizontally. Stack up your preferred meat, cheese, and maybe some pre-grilled veggies. Then heat in a panini grill press.
For dipping in olive oil. Served warm, and cut into small slices, ciabatta is a great way to start a meal. Dip in good olive oil, add a little flaky salt if you like, and maybe even a little good quality balsamic vinegar.
Garlic bread. Cut slices of ciabatta, and brush generously with a mixture of olive oil, finely crushed garlic, and optionally some finely chopped Italian flat leaf parsley. Bake in the oven until toasted.
Croutons for soups, salads or stuffings. When your ciabatta is a few days old, and starting to go stale, chop it into bite-sized rough cubes, toss it in olive oil and whatever seasonings you like e.g., herbs, garlic, grated Parmesan. Then bake or fry until crunchy.
YIELD
4 small/medium size loaves of ciabatta
EQUIPMENT
A large pizza stone. (If you don’t have a pizza stone, you can use a large baking tray.)
A fine mesh strainer for dusting flour
A bench/dough scraper
A handful of ice cubes for throwing in the oven to create steam
INGREDIENTS
1⅔ cups (400g) lukewarm water, that is somewhere between 80°F and 100°F (27°C to 37°C)
1½ tsp (9g) salt
2 tsp (7g) any dry yeast
3¼ cups (450g) strong flour, around 13% protein (plus lots more flour for dusting)
INSTRUCTIONS
Preparing the dough
Combine the water, salt, and yeast

Mixing the water, salt, and yeast
In a large bowl, mix together the lukewarm water, salt and yeast. Don’t worry about mixing the salt and yeast together like this - it’s a myth that this will kill the yeast.
I like to use a square bowl for this, because it will make shaping the dough later easier. I used a 9 x 9 inch (22 x 22 cm) square glass bowl with a plastic lid made by Bormioli Rocco from their Frigoverre range of products.
Add the flour

Combining the flour with the water/salt/yeast mixture.
Add the flour, and mix well using a fork to form a very wet, loose shaggy dough. Cover the bowl, and leave dough for 30 minutes to allow the flour to hydrate.
Stretching and folding the dough
We are going to perform four rounds of "stretches and folds". Take one side of the dough, stretch and fold bringing the dough to the opposite side of the bowl. Rotate the bowl one quarter and repeat another 3 times. (See video for details of the stretch and fold technique.)
Stretching the ciabatta dough

Folding the ciabatta dough
Cover the bowl and leave for 30 minutes.
Repeat the stretch and fold process another 3 times, leaving 30 minutes in between each round.
Allow the dough to proof
After your last series of stretch and folds, cover the dough with plastic wrap and place in the fridge over night. The cold overnight fermentation really helps to develop delicious flavors in the ciabatta.
Shaping the ciabatta
The next day, take the ciabatta out of the fridge. Aside from developing great flavors overnight, the dough is much easier to work with cold compared to when it’s at room temperature.

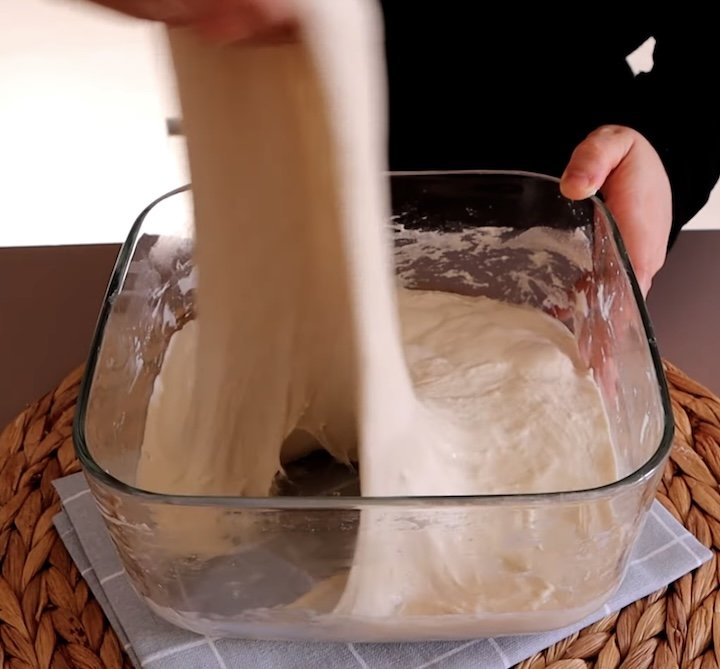
The ciabatta dough after cold overnight fermentation. Notice how bubbly it is!
Prepare your work surface

Preparing the work surface by dusting with flour. Note the use of a fine mesh strainer.
Generously dust a region of your counter top with flour. It should be a big enough region for you to tip the dough out onto the floured surface. The dough is very wet, so I recommend using a fine mesh strainer to ensure there are no gaps in the flour on the surface. If there are gaps, the dough will stick the counter top, and you won’t be able to shape it.
Prepare the clean dish towels for final proofing

Preparing a dish towel for final proofing of two medium loaves of ciabatta. Note the use of a fine mesh strainer for dusting the flour.
You will be using two clean dish towels for the final proofing stage of the bread. We’re using towels in place of the couches (linen cloths used for final proofing) that bakeries would use. I’m assuming you don’t have any linen couches lying around in your kitchen, and the dish towels work just as well!
Using a fine mesh strainer, as you did for the countertop, dust two patches of the dish flour on one end of each towel. That’s four patches in total—one for each small loaf of ciabatta. You will be placing the shaped loaves on the patches of flour for final proofing. This will allow you flip the clean half of the towels over onto the loaves to cover them.
Transfer the dough to the prepared countertop

Transferring the dough onto the prepared work surface
Transfer the dough to the floured work surface by turn the bowl upside down. Let gravity do the work of letting the dough fall out of the bowl. Be patient — give the bowl a rub and a tap, and the dough will come loose.
Cut the dough into four equal portions

Folding the dough in half before cutting it.
Using wet hands, and working quickly and with a light touch, tidy up the dough so it forms a square. Then quickly fold it in half so the dough forms a rectangle. (Doing this will create more tension in the dough, which will give the ciabatta more oven spring when it goes in the oven.). Tuck in all the edges so the dough forms a neat rectangle.
Using a bench scraper, divide the dough into four small, roughly equally sized loaves (see photo below).

Dividing the dough into four small loaves using a bench/dough scraper
Final proofing

Transferring a portion of dough to the prepared dish towel
Using you fingers in a block like paddles, quickly pick up a portion of dough from the counter top with your fingers underneath the dough and transfer it to a prepared patch of flour on one of the dish towels. Gently, shape it roughly into a rectangular shape (see photo above).
Repeat this for the other portions of dough. Then, gently flip the clean halves of the towels over to cover the ciabatta (see photo below). Allow the loaves to proof for a final 20 minutes.

Covering the loaves of ciabatta dough for their final proofing.
Bake the ciabatta
Preheat the oven
While the dough is proofing for its final stage, preheat your oven with a large pizza stone in it to 450°F (230°C). If your oven has a convection fan fan, make sure the fan is on.
Using a pizza stone (or pizza steel) is really the best way to bake ciabatta (see photo below). If you don’t have a pizza stone, you can use a large baking tray instead.

The pizza stone Emma uses for baking ciabatta
Transfer the dough to parchment paper for baking
Prepare two pieces piece of parchment paper big enough to easily fit two of the small loaves.
Now, this next step is the trickiest part of the entire recipe! So don’t be discouraged if it goes a bit wrong on the first attempt! Once you understand what you’re trying to do, you’ll soon get the hang of it!
Right now, you have your portions of dough resting on the dish towels. The bottom sides of the dough will become the top sides of the ciabatta. So you need to flip them over before transferring to the parchment paper as gently as possible to avoid loosing any air. I like to use a large bench scraper to help with this. (See the next two photos below for how to do this).

A portion of dough resting on a dish towel, about to be flipped upside down onto a bench scraper.

A portion of dough flipped upside down onto a large bench scraper. What was the bottom side of the dough is now on the top. From here, simply slide the dough onto the parchment paper.
If you don’t have a large bench scraper, you can very gently flip them over directly onto the parchment paper.
Bake the ciabatta on the pizza stone

You will be baking the 4 loaves in two batches.
Slide one piece of the parchment paper with two loaves onto the preheated pizza stone.
Throw a handful of ice cubes into the bottom of the oven, and close the oven door. This will create a steam environment that will allow the ciabatta loaves to rise quickly before the crust sets.
Bake for around 15 to 20 minutes. Please note the timings are only a guide because every oven is different. The ciabatta is ready when it’s a deep golden brown color—use this visual sign to tell when the bread is ready.
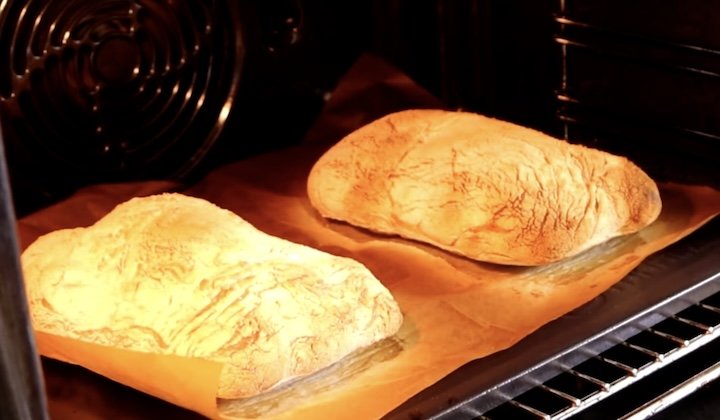
Two loaves of ciabatta, ready to come out of the oven.
When the loaves are baked, remove them from the oven and places on a wire rack and allow them to cool completely before using.
Repeat the baking process for the other two loaves.

A loaf of Emma’s no-knead ciabatta after it’s cooled
Making sandwiches using ciabatta
The key to making a good sandwich using ciabatta is to split the bread open horizontally. That way, the you have all exterior crust available to hold on the juice in from a moist sandwich.

Making a sandwich using ciabatta with a filling of mortadella, burrata and arugula.
An iconic Italian sandwich to make using ciabatta is with mortadella (often known in the United States as baloney), creamy burrata and some peppery arugula. It’s delicious!
You might also like…
Easy Italian No-Knead Bread
Big Bubble No-Knead Focaccia
Watch the video for more tips


Hi! I’m Emma Fontanella. Here you’ll find trusted, tested recipes to satisfy your baking addiction and carb cravings. Learn more…
Tried one of my recipes? Please let me know on Instagram (@emmafontanella) or TikTok (@emma.fontanella)! Hashtag #emmafontanella
Search for another recipe…