
5 Ingredient No-Knead Sandwich Bread Recipe

Emma Fontanella’s 5-Ingredient No-Knead White Sandwich Bread
“Like Store-Bought, But Better” — About My Easy No-Knead White Sandwich Bread
This sandwich bread recipe is a no-knead recipe, so it’s super easy to make.It has a soft white crumb and a soft golden crust, and it’s absolutely delicious! It delivers everything you want from a sandwich bread—whatever you use supermarket bread for, this recipe works every bit as well!
For many of us, the white bread we buy in the supermarket is a guilty pleasure because we all know it’s not “real bread”. I wanted to give you a fool-proof way of making amazing sandwich bread, that’s real bread, at home using just a handful of good ingredients.
If you like this sandwich bread recipe, you’ll find more great bread recipes in my new cookbook, Simple Pleasures, which is out now.
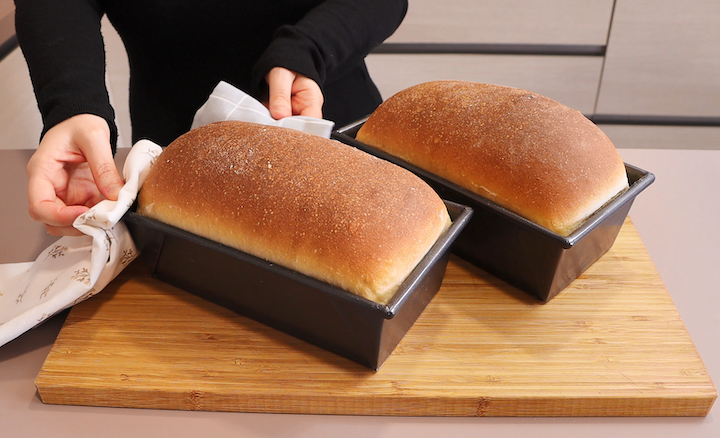
Two loaves of Emma Fontanella’s sandwich bread made using each of the two methods for preparing the dough: one no-knead; and one using a stand mixer. See how both methods give identical results.
No-knead methods are perfect if you don’t have a stand mixer or if you don’t want to be bothered, or you don’t have the strength, to spend a lot of time continuously kneading the dough by hand.
I know many of you love your stand mixers, though—I do too! So I’m also giving you a method for making this bread using your stand mixer.
I made sure that both methods give identical results. So, which ever method you use, I think this the best sandwich bread you’ll ever taste! I like to say it’s like store-bought, but better.
What makes good white sandwich bread?

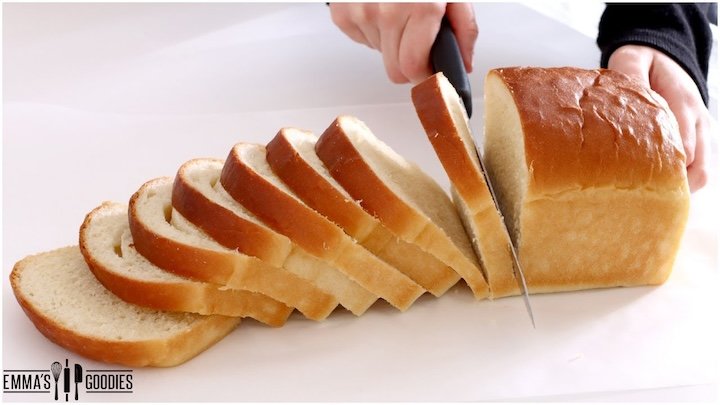
Emma Fontanella’s white sandwich bread. The soft crumb and soft, thin crust make it super easy to slice.
White sandwich bread is, in many way, quite a feat of science and engineering! With all the uses we put it to, it needs to have so many different properties.
I designed this recipe to deliver everything that we all love about sandwich bread, but using only a handful of simple ingredients:
Both the crumb and the crust are super soft
The crumb is dense, without big air bubbles
The crust is thin and golden in color
The loaf slices beautifully
Slices are strong enough that we can butter them, or spread peanut butter on them, without tearing or breaking
A slices is flexible enough that we can fold it in half without breaking (for a quick one-slice sandwich!)
Slices are strong enough to hold lots of sandwich fillings without falling apart.
The loaf stays fresh for days
What kind of flour should I use for this sandwich bread?
For this recipe I used a white bread flour with 13% protein content. Any white bread flour will work, though.
If you want to use a strong all-purpose flour of the kind you can find in North America, you can. For outside North America, though, all-purpose or plain four might not be able to support the rise that we want in this loaf. So, bread flour is really recommended.
Regardless of the flour you use, though, remember that every flour absorbs liquid differently. Particularly if you’re using a flour with a lower protein content, you may need to reduce the amount of milk in the recipe to get the right bread texture. If you find that your loaf comes out with too many air bubbles, instead of a close, tight, crumb, that means you need to use less milk with your particular flour.
What kind of yeast should I use?
You can use any kind of dried yeast you find in the supermarket. Look for products with names like “active dry yeast”, “instant dry yeast”, or “instant yeast”. These products come in sachets, boxes, jars and cans. All will work great.
Once you’ve opened a jar, can or sachet of dry yeast, it won’t last forever. It’s best to store it in the fridge, or even the freezer. That way, it will last a few months. Say around 4 months in the fridge, or 6 months in the freezer. So, if you’re not planning on using yeast that much, it’s best to buy it in the smallest quantity you can.
Can I substitute the sugar?
Yes you can. In the recipe, I call for white granulated sugar. However, if you prefer you can substitute the sugar for 1½ tablespoons (30g) of honey or maple syrup. You can’t use artificial sweetener though.
About Supermarket Bread
As I mentioned above, even if it’s not “real bread”, supermarket sandwich bread really is a triumph of science and engineering. If you look at the ingredients on a typical loaf of supermarket sandwich bread in the United States, you’ll often find it’s a long list.

An example ingredients list from a loaf of supermarket sandwich bread in the United States
Now, I’ll leave it up to you as to whether you want to eat a product with an ingredients list like that—it’s a personal decision. The point I wanted to make is that every ingredient in that list is playing a role in giving the bread some particular property or properties that we want e.g., soft texture, stopping spoiling etc.
How do the ingredients in my homemade sandwich bread work?
If we want to make a sandwich bread that’s “real bread”, using just a few good quality ingredients, we really have to make each ingredient work for us. Typically in bread making, we just use flour, water, salt and yeast.
However, if we did that here, we wouldn’t get anything close to sandwich bread! The crust would be too thick and hard; the bread would go rock solid and stale after a day; and it would go moldy not long after that.
This recipe still uses flour, salt and yeast, but we don’t use water. We then add milk, sugar and olive oil to the mix. Here are the ingredients we use in in this sandwich bread recipe, and the particular characterstics they bring to the bread:
Whole milk
We use milk instead of water for this recipe. The proteins, fat and lactose in milk give multiple benefits, including helping to: giving the crumb a soft texture; giving the crust an attractive brown color; making the crust soft; making the crust thin; and delaying staling.
White granulated sugar
People often add sugar to bread because they think the sugar is needed to feed the yeast. That’s completely unnecessary because yeast produces enzymes that break down the starch in flour into sugars, which then act as food for the yeast.
However, for sandwich bread, adding sugar plays some important roles. Sugar is hygroscopic which means that sugar molecules attract molecules. Via various mechanisms, this property of sugar both helps delay staling, and also delays growth of mold.
Olive oil
The fat molecules that make up olive oil serve several purpose in this recipe. First, they bind to the starch-water complex that makes up bread dough. This gives the sandwich bread both strength and flexibility.
It also slows down staling by stopping the starch and water molecules separating in the baked bread. That separation is the main process by which bread goes hard as it stales—it’s called starch retrogradation. The oil is the main ingredient that will make our bread stay soft for days.
The oil also forms a physical barrier that helps stop the bread drying out – remember oil and water don’t mix. As the starch and water molecules slowly separate in the baked bread, the oil helps stops them leaving the bread. The sugar we added will bind some of those water molecules, which stops them being available for mold to grow on as they hang around in the bread.
Finally, because the fat molecules in olive oil are liquid at room temperature, it will help the bread seem moist for longer. (Some recipes use butter, but that’s solid at room temperature so isn’t as good, in my opinion.)
Bread flour
We use bread flour for this recipe. The recommended protein content is around 13%. That provides the quality and quantity of gluten we want to support a high rise on the bread. We want the gluten network to be strong enough to support dough rising well above the sides of the loaf pan, to give the sandwich bread its characteristic shape.
Yeast
The yeast is the raising agent and works by fermentation. As the bread dough is proofing, the yeast breaks down some of the starch molecules in the flour into glucose which acts as food for the yeast. A product of this process is carbon dioxide. Bubbles of carbon dioxide are trapped in the dough, causing it to rise both during proofing, and when the bread is baked in the oven.

Making a sandwich using the sandwich bread. Note how thin the crust is, and how attractive it is in color—this is due to using milk instead of water in the recipe.
I hope you can now see how these extra ingredients work together to give us all the characteristics we want in a loaf of sandwich bread: soft texture; strong enough to hold lots of sandwich fillings, but also flexible; a thin soft crust; stays soft for days; and resists molding for days.
YIELD
One loaf of white sandwich bread.
EQUIPMENT
An 8.5 x 4.5 inch (21 x 11cm) loaf pan
A stand mixer for Method 1 (not required for Method 2).
INGREDIENTS
1 cup + 3 tbsp (280g) whole milk, lukewarm. That is somewhere between 80°F and 100°F (27°C to 37°C).
2 tbsp (30g) white granulated sugar (or see the “Can I substitute the sugar?” section above)
2 tbsp (30g) olive oil (or any oil that’s liquid at room temperature, such as sunflower oil or vegetable oil)
2 tsp (7g) yeast. Any instant or active dried yeast will work. (See the section “What kind of yeast should I use?” above)
1 tsp (4g) salt
3 cups (420g) white bread flour with 13% protein content (please see the section “What kind of flour should I use for this sandwich bread?” above)
INSTRUCTIONS
Make the dough
Prepare the dough using your choice of either Method 1 (Stand Mixer) or Method 2 (No-Knead). Both will give you exactly the same results, so pick the method that suits you best. The quantities of ingredients in the recipe make one loaf.
Method 1 (Stand Mixer)
Warm the milk in the microwave.
Into the bowl of a stand mixer add the bread flour and the liquids, and you want to mix the ingredients on medium speed until the dough comes together. Then increase the speed to high and knead for another 3 minutes. The dough should pull away from the sides of the bowl and feel tacky.

Kneading the dough in a stand mixer. The dough is ready when it pulls away from the sides of the stand mixer bowl as it has in this photo.
Grease your bowl, grease your hands, and shape the dough into a ball. Cover the dough and set aside to rise for 2 hours.
Once the dough has tripled in size, we’re ready to make sandwich bread. Jump over Method 2, and go to the section “Shaping the loaf and baking the bread” to continue the recipe.
Method 2 (No-Knead)
Warm the milk in the microwave.
In a bowl combine warm milk, salt, sugar, oil and yeast. Give these ingredients a mix to dissolve the sugar and salt and add the flour. Mix everything together with a fork, until it forms a rough, shaggy dough.

Bringing the dough together. The ingredients have been mixed just until they form a rough shaggy dough.
Now, this dough is similar to my English muffin dough, meaning it’s a relatively low hydration dough. So, it’s not going to be as wet as your typical no knead bread doughs. And there’s a reason for that. If you’re familiar with bread making, you’ll know that high protein flour along with high hydration yields big air bubbles and lots of them too. However, sandwich bread has a very tight soft crumb. You achieve this by using a lower hydration.
Now, because this is a low hydration dough, eventually you’ll have to switch to using your hands, otherwise your fork will break! You want to wet your hand with water, and continue mixing, making sure there are no dry patches of flour and dough. Using a wet hand really allows you to hydrate any dry patches of dough. Cover the dough, and let it rest for 30 minutes to allow the flour to continue to hydrate.
Stretching and folding the dough

Using wet hands to stretch and fold the dough. This is so much easier than continuously kneading the dough.
After 30 minutes, we’re going to do what we often do with no-knead doughs. We’re going to do the good old stretches and folds. Wet your hand and perform your first series of stretch and folds, turning the bowl one quarter, as we go. Take one side of the dough, stretch and fold the dough onto the opposite side. Do about four folds.

Balling up the dough after a round of stretches and folds
Then take your wet hand, and push the dough under itself, creating a rounded ball. This method along with the stretch and folds allows you to start to develop the gluten network. As you can see, we went from shaggy dough, to a nice soft dough ball.
Cover the no-knead dough and set aside for 30 minutes to allow the gluten to develop and to relax so it’s ready to stretch again. Then come back and do a second series of stretch and folds. You want to do about 4 folds per session.
You’ll know when to stop because the dough won’t be elastic anymore, at that point, using a wet hand, you’re going to ball up the dough again and come in 30 minutes and perform your third series of stretch and folds.
Repeat this process another two times. So four series in total. After every series, ball up the dough, pushing the dough under itself and creating a smooth plump dough.
After the last series of stretch and folds, cover the dough and allow to rise for 1h.
Once the dough has tripled in size, we’re ready to shape the loaf and bake the bread.
Shaping the loaf and baking the bread
Whether you followed Method 1 (stand mixer) or Method 2 (no-knead) for preparing the dough and giving it its first rise, the rest of the recipe is the same for both loaves.
Generously butter, your loaf pan and line the bottom with parchment paper.
Transfer your dough onto your lightly floured, clean work surface and using your pan as a guide we’re going to roll out this dough using a rolling pin into a rectangle.

Rolling out the dough using a rolling pin. You want to end up with a rough rectangle where the width of the rectangle is about the same width as your loaf pan.
This smooth surface is going to be the outside of the bread. So, flip it over, smooth out the other side, and starting from one of the ends shape the loaf by rolling up the bread into a sausage shape. Tuck the ends in.

Shaping the loaf by rolling it up into a sausage shape.
Place the roll in pan, seam side down.

Placing the shaped loaf into the loaf pan, seam side down. Notice the top surface of the dough is smooth.
Cover the shaped loaves and allow to rise for about one hour. It might take more or less time than this because every kitchen is a different temperature, and every yeast is in a different state when you use it. So, use visual signs to judge when it’s proofed. When the dough is correctly proofed, you should see it’s risen above the top of your loaf pan (see the picture below).

A correctly proofed loaf of sandwich bread dough. See how the dough has already risen above the top of the loaf pan, even before baking.
Now bake in a preheated oven at 350 F, that’s 180 C. It will take around 25 minutes. It might take more or less time than this because every oven is different. So, again, use visual signs to judge when it’s baked. It will be well risen and a medium golden brown on top. Don’t get it too dark on top. But don’t take it out when it’s too pale, either!
You’ll notice that we didn’t add any water or ice to the oven to create steam for this bread. That’s because we only do that when we’re making crusty bread. For sandwich bread, we’re going for a soft crust.

Two finished loaves of sandwich bread made by using each of the two methods. Notice how the final results are identical.
While the bread is still hot, brush the top with butter. This will make the soft crust super delicious. Remove the bread from the loaf tin, and let it sit on a wire rack until it’s completely cool. That will be at least a couple of hours. Don’t cut into it before then, otherwise you’ll end up with a gummy loaf of bread!
The bread will keep for about a week, covered at room temperature. You can even pre-slice it if you want, just like the bread you get at the supermarket. Keep it in plastic bag at room temperature. It will also keep frozen for a month or two. When freezing, I like to slice it first, so I can just take out the slices I want.
You can toast them direct from the freezer, or they’ll quickly defrost if you want to use them for sandwiches. Don’t store it in the fridge! It’s surprising I know, but fridge temperature is the temperature where bread goes stale the fastest! So, the rule for bread is – store at room temperature OR freeze it.
Watch the video for more tips
5 Ingredient No-Knead Sandwich Bread recipe

Hi! I’m Emma Fontanella. Here you’ll find trusted, tested recipes to satisfy your baking addiction and carb cravings. Learn more…
Tried one of my recipes? Please let me know on Instagram (@emmafontanella) or TikTok (@emma.fontanella)! Hashtag #emmafontanella
Search for another recipe…