
Homemade No-Knead Bagels Recipe
Emma Fontanella’s Easy No-Knead Bagels
About My No-Knead Bagels
This bagel recipe is a no-knead recipe, so it’s super easy to make and delivers next-level results. It requires no special equipment such as a stand mixer, and needs only pantry staple ingredients that you probably already have.
I know many of you love bagels as much as I do. So, I wanted to give you a foolproof no-knead method for making bagels that delivers on that signature dense, chewy texture and tight crumb.
This recipe is based on the bagel recipe in my cookbook, Simple Pleasures. The main difference is in hydration level of the dough, which we need to adjust to allow a no-knead method to work.
I also wanted to keep the recipe here super easy — anyone can make these bagels. But if you want to get a little fancier, in my book I show you how to modify the basic dough to create onion bagel, egg bagel and raisin bagel doughs; just the way we do in bakeries. I also show you how to create your own personalised Everything Bagel topping mix, and how to work with tricky toppings like onion flakes.
The best bagels are freshly baked bagels, and you can’t get fresher than homemade, right out of the oven in your own kitchen. Bagels are incredible versatile. Split them open, and fill them with whatever fillings you like.
You can’t go wrong with cream cheese, and they’re amazing filled with bacon, egg and cheese! My personal favorite is cream cheese, smoked salmon and either peppery arugula, or a little red onion and a few capers. That’s my perfect bagel, but feel free to use whatever fillings you like. Toasted or untoasted!
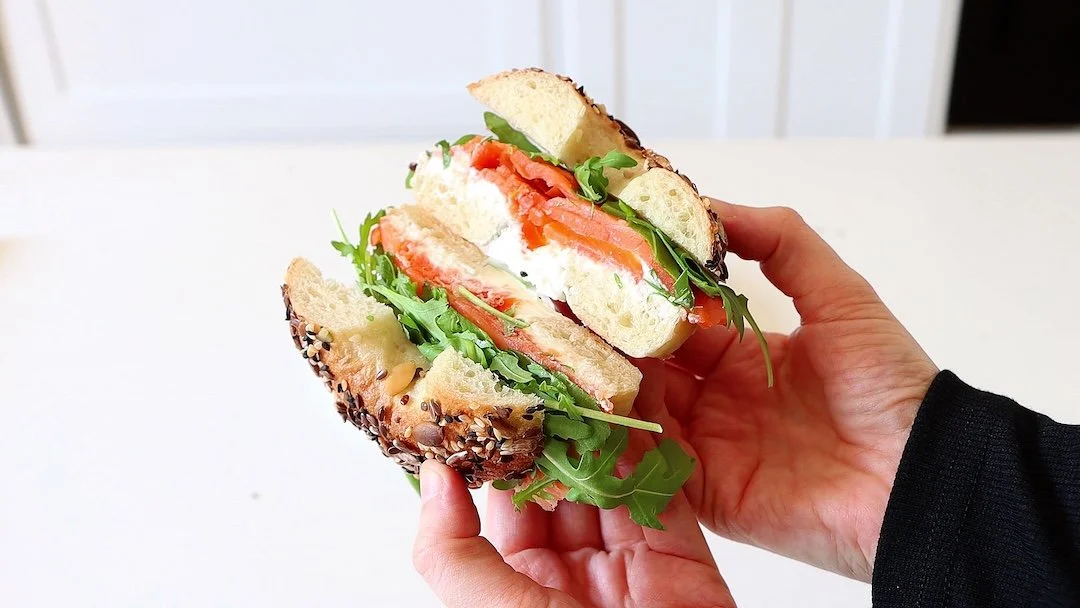
Emma’s favorite bagel - cream cheese, smoked salmon and peppery arugula.
What flour is best for bagels?
You should use a flour with a protein content somewhere between 12% and 14% to make great bagels. In the United States, all-purpose flour will work well. Bread flour is also great, and if you live outside the US, I recommend you use bread flour for bagels. If you’re looking to make a style of bagel that has a long fermentation step (say 24 to 48 hours), I recommend considering using a bread flour designed for long fermentations, otherwise the dough can become too loose with time.
What makes this recipe no-knead?
The key aspect of the recipe that allows it to be no-knead is the hydration level. This dough contains more water than than traditional bagel doughs. Because to that, you can perform the stretches and folds easily. (Of course, you can use a stand mixer on this dough if that’s what you prefer). To be precise, this recipe calls for a 64% hydration dough. Traditionally, bagel dough is quite stiff at around 55% hydration, and works best with a stand mixer.
In part, the traditional lower hydration is used because there’s a myth that if you add more water, the bagel will lose its signature dense, chewy texture. That’s not how it works (see the sections, “What is the secret to making bagels?” and “What makes bagels dense and chewy?” below). As long as you keep hydration at under 65%, and you do the boiling step correctly, you will get a great result.
Regional bagel variations in North America
There are couple of truly iconic, traditional types of bagel: the New York bagel and the Montreal bagel. But today, there’s a dynamic new wave of bagel making taking place all across North America as people bring interpretations like sourdough (particularly in California), which reflect local artisan styles of bread making.
What are the ingredients for bagels?
The minimal set of ingredients for a great bagel are flour, yeast, water, sugar and salt. These ingredients are used create a dough that is then boiled before baking, giving bagels their distinctive dense, chewy texture. Then, there are optional additions to create different styles of bagels, such as barley malt syrup, malt powder, honey, oil, eggs, raisins, food-grade lye, baking soda, sourdough starter, and of course a whole range of seeds and toppings to add flavor and texture. These optional additions can create styles like, New York bagels, Montreal bagels, Californian sourdough bagels, Everything bagels and more.
To Toast or Not To Toast?
When they’re freshly baked, many bagel afficionados say it’s a crime to toast them. I wouldn’t go that far! But, if you’re never had a really fresh-baked bagel before (if you haven’t tried homemade, the chances are you haven’t), I recommend trying them untoasted when they’re super fresh. If the bagels are a bit old, and certainly if they’re more than a day old, toasting them will bring them right back to deliciousness. In reality, there are no rules. I’ve been known to toast freshly baked bagels. So, you do you.
What is the secret to making bagels?
The secret to making bagels, and what makes them different to other types of bread, is the boiling step. Once the bagels are ready to bake, before baking, you need to put them in boiling water or nearly boiling water for about a minute, flipping them over half way through. This is the step that makes the finished bagels end up with the dense, chewy texture. It’s really what makes a bagel a bagel.

A no-knead bagel split open to show the dense, chewy texture.
What makes bagels dense and chewy?
The hot water treatment step is key to make bagels bagels. But how does putting the bagels into hot water make the interior so deliciously dense and chewy? Well, it’s all about starch. When we put the bagels in very hot water that’s above 180°F (just over 80°C), starch granules at the surface of the dough burst, releasing starch molecules that then link together to make a wrinkly skin around the bagel. That skin is tough enough to stop the bagels expanding as they bake, which would create any airy interior, like you get in most bread. So, because the bagels can’t expand and become airy, the interior is kept deliciously chewy.
Is it worth making your own bagels?
Yes! I’m going to tell you a secret that no bagel shop is going to tell you. Bagels are at their best when they’re freshly baked. They start to degrade quickly as soon as they reach room temperature. So, the truth is, the easiest way to guarantee world-class bagel is to make it yourself. Otherwise, you’ll have hang around a good bagel shop and watch for when a fresh batch is available.
Are bagels healthy?
Bagels are no more or less healthy than other breads, although if you add seeds on top, those are really good for you. The key with eating any bread, including bagels, is moderation. Bagels are great as part of a balanced diet. They’re not a weight loss food though.
What is the most popular bagel filling?
The most popular bagel filling is cream cheese with the most popular order being cream cheese on a toasted bagel. The most iconic New York-style bagel, though, has cream cheese, cured salmon (smoked or unsmoked), with red onion, capers and tomato. Options like jam, jelly, and avocado are also popular. Bagels are also often used as the bread for that most famous of New York City breakfast sandwiches — the “Bacon, egg and cheese”.
PREP: 20 minutes, plus 2 hours to rise
COOK: 18 minutes
YIELD: About 12 bagels
INGREDIENTS
2 cups (480g) luke warm water. That is, somewhere between 80°F and 100°F (27°C to 37°C)
2 tsp (7g) active dry yeast
5¼ cups (750g) all-purpose flour
¼ cup (50g) granulated white sugar
2 tsp salt
2 tbsp olive oil, plus more for greasing
1 large egg white, beaten (for egg wash)
INSTRUCTIONS
Wake up the yeast, and check it’s working
To a large bowl, add the warm water, oil, sugar, salt and yeast. Give these ingredients a good whisk. Set aside for about 5 minutes or until this mixture becomes foamy. That’s your cue that the yeast is alive and well. This is a useful thing to do even with instant yeast, especially is old.
Make the dough
Add the flour in one go and mix everything together with a fork, until it forms a rough, shaggy dough. If your dough seems dry, don’t be afraid to add an extra 1 to 2 tablespoons of water. Every flour absorbs liquids differently, so you might need a little extra water.
Now eventually, you’ll have to switch to using your hand, or your fork will bend. You want to wet your hand with water, and continue mixing, making sure there’s no dry patches of flour and dough.
Using a wet hand really allows you to hydrate any dry patches of dough. The dough should feel tacky, but not wet. Cover the dough and let it rest for 30 minutes to allow the flour to properly hydrate.
Perform the stretches and folds
After 30 minutes, we’re going to do what we often do with no-knead bread making. A round of stretches and folds. You mostly see this method for wet, high hydration doughs. But did you know can also use this method for lower hydration doughs like this? We just do it a little differently.
Wet your hand and perform your first series of stretch and folds, turning the bowl as we go. Take one side of the dough, stretch and fold the dough onto the opposite side. Do about 4-5 folds. Then take your wet hand, and push the dough under itself, creating a rounded ball.
This method along with the stretch and folds allows you to start to develop the gluten network. As you can see, we went from a rough, shaggy dough to a nice plump dough.
Cover the no knead dough and set aside for 30 minutes to allow the gluten to relax. Then come back and do a second series of stretch and folds. You want to do about 4 to 5 folds per session. You’ll know when to stop because the dough won’t be elastic anymore. You’ll try to stretch it, and it will feel tense. At that point, using a wet hand, you’re going to ball up the dough as we did before and come in 30 minutes and perform your third series of stretch and folds.
Repeat this process another two times, so you’ve done four rounds of stretch and folds in total. After every series, you do want to ball up the dough, pushing the dough under itself and creating a smooth plump dough. After the last series of stretch and folds, cover the dough and allow to rise for 1-2h.
Divide the dough into 12 equal portions
Transfer your dough onto your clean work surface and we’re going to make bagels.
Divide the dough in 12 equal portions. Each portion should be about 3.5oz (100g). I like to weigh the dough, but it’s not necessary. Just try to make the bagels as even as possible - we want them to bake evenly.
Shape the bagels
Many people roll each portion of dough into a ball and usually using your fingers you punch out a hole through the middle and set aside to rise for about 40 minutes. I personally use a different method, which is easier and also gives you a more precise bagel as you’ll see.
This is how I like to do it. Roll the dough into balls, but don’t puncture the hole just yet. Set the balls of dough onto some parchment paper, cover and set aside for 40 minutes.
In the meantime, bring a large saucepan of water to a strong boil. (We’ll need the hot water in the next step of the recipe)
Just before dipping in each bagel into the hot water in the next step, we punch a hole out. You can use a small cookie cutter, anything that’s small and sharp. I like to use the back of a piping tip.
The reason I like to cut the hole now, instead of earlier is so that the bagel maintains that hole. If you make the hole in the beginning, as the bagels rise, they lose their hole.
Boil the bagels
This step is what gives the bagels their characteristic dense, chewy texture. There’s no getting around this step.
Let’s talk bagel texture for a moment. The key to a good bagel is the soft, dense, chewy interior. Unlike my big bubble focaccia recipe, there’s really no such thing as a big bubble bagel! If you see lots of large air pockets in the crumb of a bagel, it means it wasn’t made properly.
Once the water is boiling, turn the heat off and lower each bagel with it’s parchment paper into the water bath for about 30 seconds to a minute. The bagels should float, if they don’t float that means the dough hasn’t risen enough.
Now, why is this hot water treatment step so important? How does putting the bagels into hot water make the interior so deliciously dense and chewy?
Well, it’s all about starch. When we put the bagels in very hot water that’s above 180°F (about 80°C), starch granules at the surface of the dough burst, releasing starch molecules that then link together to make a wrinkly skin around the bagel.
That skin is tough enough to stop the bagels expanding as they bake, which would create any airy interior, like you get in most bread. So, because the bagels can’t expand and become airy, the interior is kept deliciously chewy. This step is really what makes a bagel a bagel.
When you see air pockets in the crumb of bagel, it’s almost always because the water wasn’t hot enough to burst the starch granules, or the bagels weren’t left in the water long enough to form the wrinkly skin.
I call this the prune stage. If you’ve never made bagels before, you might think you’ve ruined them, but fear not, I hope you can see now that it’s exactly what you want. As they bake them, that skin on the bagels smooths out and loses its wrinkles. If only this method of wrinkle removal worked for skin care! Am I right?!
You can add various things to the water, like baking soda or lye that will affect browning and texture of the crust, and malted barley syrup or honey. But I wanted to keep things simple for this recipe.
Bake the bagels
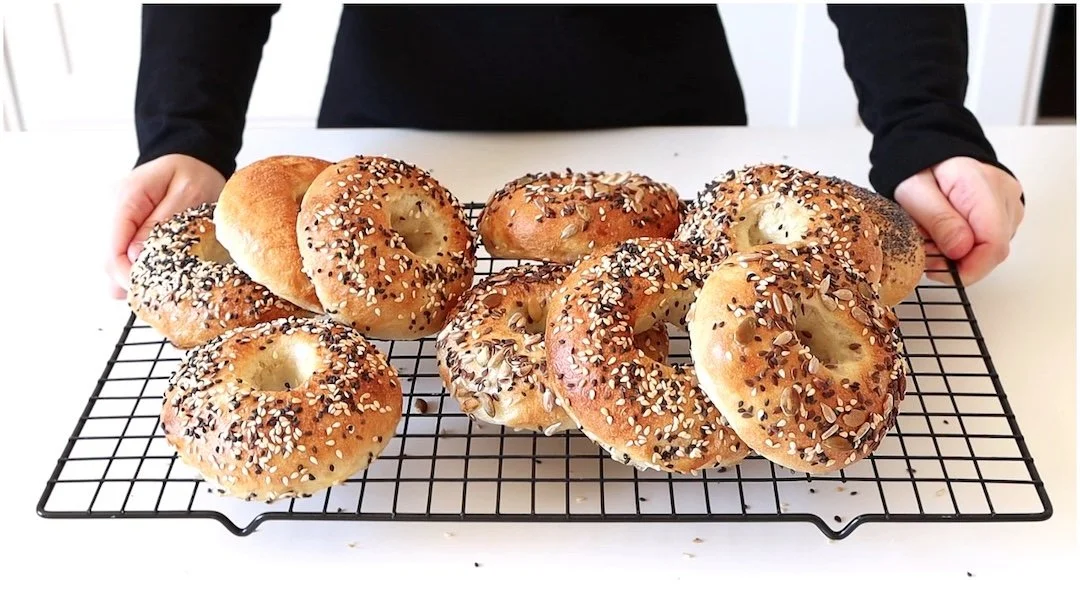
The finished bagels on a cooling rack.
Place the bagels on your lined baking sheets using a slotted spoon, and you want to leave enough space between each bagel.
Brush each bagel with a beaten egg white and add your toppings. Everything bagel seasoning is a classic, but even just a mixture of sesame seeds, or poppy seeds, or even pumpkin seeds, it is fall after all.
Bake the bagels in a preheated oven at 430°F (220°C) for about 16 to 20 minutes or until golden.
Take them out of the oven, and allow to rest for 5 minutes, before removing them from the parchment paper and placing on a rack to cool.
Make Ahead & Freeze
Once cool, transfer the bagels to a zip-top bag and store at room temperature for up to 5 days or freeze for up to 1 month.
Watch the video for more tips


Hi! I’m Emma Fontanella. Here you’ll find trusted, tested recipes to satisfy your baking addiction and carb cravings. Learn more…
Tried one of my recipes? Please let me know on Instagram (@emmafontanella) or TikTok (@emma.fontanella)! Hashtag #emmafontanella
Search for another recipe…