
Easy English Muffins Recipe
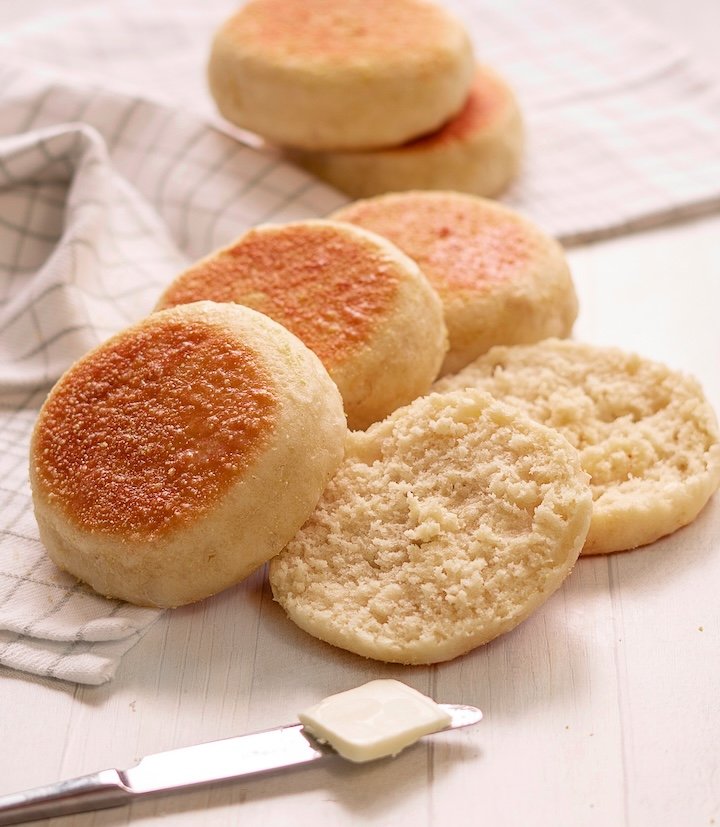
Emma Fontanella’s Easy English Muffins. Note the nooks and crannies in the structure of the inside of the muffins.
About My Easy English Muffins
If you’ve only ever had store-bought English muffins before, you’ll be shocked at how good the homemade versions are. All homemade bread is so much better than industrial supermarket bread. This recipe is so easy to make—the muffins are made right on the stove stop with no oven required.
It delivers delicious, plump English muffins, with a golden brown griddled crust, and insides that have all the nooks and crannies you could ever want! By comparison, I have to say—the supermarket versions look kind of pale and miserable (see the photo below)!
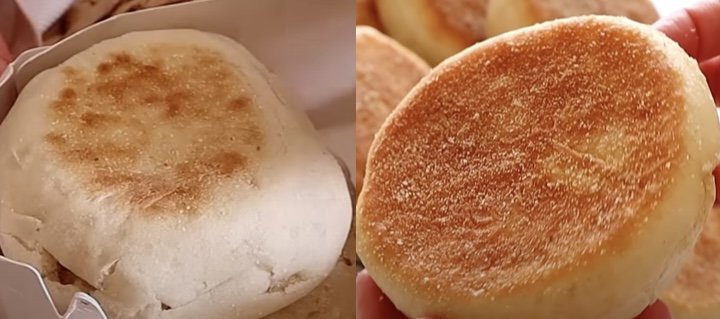
The leading brand of supermarket English muffins (left) versus Emma Fontanella’s homemade version (right).
These freeze beautifully, and toast right from the freezer, so they’re absolutely perfect for making ahead. That way, you can have fresh, homemade English muffins as part of breakfast with zero effort, whenever you want.
This recipe can be found in my new cookbook, Simple Pleasures. In the book, you’ll find many more great bread recipes, including rustic Italian bread, amazing dinner rolls, party sharing breads, and even my mom’s special focaccia.
These iconic breakfast breads are incredible simply toasted with butter and jam. They’re even better as part of a classic America breakfast sandwich. Perhaps best of all, they form the base of what I think is the perfect brunch dish of all time—eggs Benedict.

Emma Fontanella’s classic English muffin breakfast sandwich, from her cookbook, Simple Pleasures
In this recipe, I give you two option for how to make English muffins. One method uses a stand-mixer to knead the dough. The other method is a no-knead method for people who don’t have a stand mixer and who don’t want to knead the dough by hand. No oven is required for these English muffins—they cook on the stove top.
Just a quick warning —once you’ve tried these, you might never be able to go back to store-bought! I know that was true for me! Once I’d developed this recipe, I felt store-bought English muffins suddenly looked sad, pale, and grey by comparison. Even my childhood favorite brand in the US weren’t good enough anymore.
Contrary to what many people will tell you, English muffins are an English invention (the clue’s in the name!). They go back to before 1747 when the first recipe I know about was published in a London cookbook.
That cookbook, The Art of Cookery, soon crossed the Atlantic Ocean and became the most famous cookbook of its time. George Washington and Thomas Jefferson both owned copies. By the mid-1800s English muffins were well-known in the United States; and in 1880 they were commercialized by Samuel Bath Thomas in New York City.
Can you make ahead and freeze English muffins?
Yes. Once cooled, you can store English muffins covered at room temperature for 4 or 5 days, ideally in a Ziploc bag. They also freeze beautifully for up to 2 months. If you split them open before freezing, you can toast them right from the freezer.
What kind of flour should I use for English muffins?
You want to use a flour with at least 11% protein content to make this bread. In the US and Canada, all-purpose flour is great. In other countries, such as the UK or Australia, it might be better to use a bread flour.
What kind of yeast should I use for English muffins?
You can use any kind of dried yeast you find in the supermarket. Look for products with names like “active dry yeast”, “instant dry yeast”, or “instant yeast”. These products come in sachets, boxes, jars and cans. All will work great.
Once you’ve opened a jar, can or sachet of dry yeast, it won’t last forever. It’s best to store it in the fridge, or even the freezer. That way, it will last a few months. Say around 4 months in the fridge, or 6 months in the freezer. So, if you’re not planning on using yeast that much, it’s best to buy it in the smallest quantity you can.
Are English muffins and crumpets the same thing?
No, they’re not the same thing. They’re not even related. People have been confusing English muffins and crumpets for hundreds of years! English muffins are made with a bread dough that’s quite solid. Crumpets, on the other hand, are made with liquid batter, similar to pancake batter but made with yeast. They are also completely different as end product. English muffins are a bread with crispy outside and a soft crumb inside. Crumpets are chewy on the inside and full of deep channels running from top to bottom.
Are English muffins just biscuits?
No, English muffins and biscuits aren’t related! This is a common thing for people to get confused about, because people often confuse English muffins and scones. Scones are, in some ways, quite similar to some forms of US biscuit. However, scones and English muffins aren’t even slightly similar!
Why are English muffins not sliced?
Ever since the very first recipe for English muffins was published in London in 1747, the instruction has been to never let a knife anywhere near the muffins when opening them! (See the extract from that recipe below.)

An extract from the earliest known English muffin recipe first published in The Art of Cookery by Hannah Glasse in London, England, 1747. The recipe tells readers not to slice them open with a knife. It says, “but don’t touch them with a knife (to) cut them open, if you do, they will be as heavy as lead...”
Instead, English muffins should be torn apart to create the iconic nooks and crannies which made them so famous. The nooks and crannies are perfect for holding on to melted butter. If you use a knife to slice the muffins open, you won’t achieve their classic texture (see the photo below).
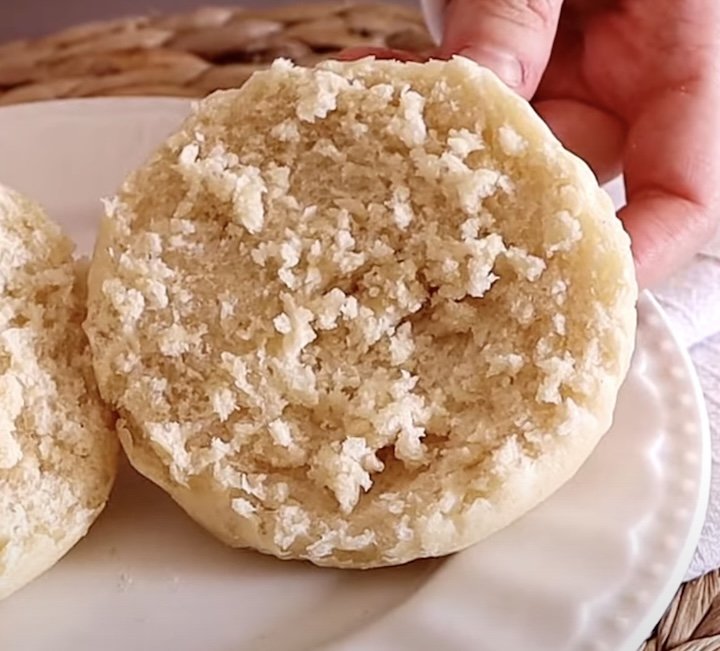
The nooks and crannies of an English muffin are created when it’s split open by hand, not sliced with knife.
Do you toast both sides of an English muffin?
The short answer is yes, toast both sides. The only exception is when they’re made fresh and straight off the griddle. That way, they’re delicious opened up while they’re still warm, with a slice of butter put inside to melt without toasting. However, they’re best toasted on both sides if you made them a day or two before, or if they’ve been frozen. And if they’re store-bought, I would say toasting them is a necessity.
Troubleshooting
Undercooked English muffins. The timing for cooking English muffins on the stove top is quite sensitive to the thickness of the muffins. If you’re finding that your muffins are underbaked when the tops and bottoms are nicely browned, it’s likely that you’re wanting your muffins a little thicker than mine.
If that’s the case the fix is easy. Once the muffins are nicely golden brown on both sides, put them on a baking sheet, and bake in a pre-heated oven (at 350°F / 180°C) for another 6 to 8 minutes. That will ensure they’re cooked through. Transfer them to a wire wrack to cool.
EQUIPMENT
Stand mixer with dough hook attachment (not required for no-knead method)
INGREDIENTS
(Yields 6 English muffins)
½ cup (120g) water
½ cup (120g) whole milk
2 tsp (7g) any dry yeast (see the section above, “What kind of yeast should I use for English muffins?” for details)
2½ cups (350g) all-purpose flour (around 11% protein)
1 tsp (5g) salt
½ tbsp vegetable oil, for greasing
2 tbsp semolina or fine cornmeal
Butter, for the pan
INSTRUCTIONS
Method 1—Stand Mixer
Activate the yeast
In a small, microwave-safe bowl or measuring cup, combine the milk and water. Microwave until lukewarm, about 30 to 40 seconds.
Don't let it get hot—you’re looking for a temperature between 80°F and 100°F (27°C to 37°C). Stir in the yeast and allow to sit for 5 minutes.
Mix the dry ingredients
In the bowl of a stand mixer, whisk together the flour and salt.
Combine and knead the dough
Using the dough hook attachment on medium-low speed, combine the dry ingredients with the yeast mixture until the dough comes together. Increase the speed to high and continue kneading for another 3 minutes.
After 3 minutes, the dough should feel tacky to the touch and look smooth. (To make the dough by hand, see the kneading section on page 19.)
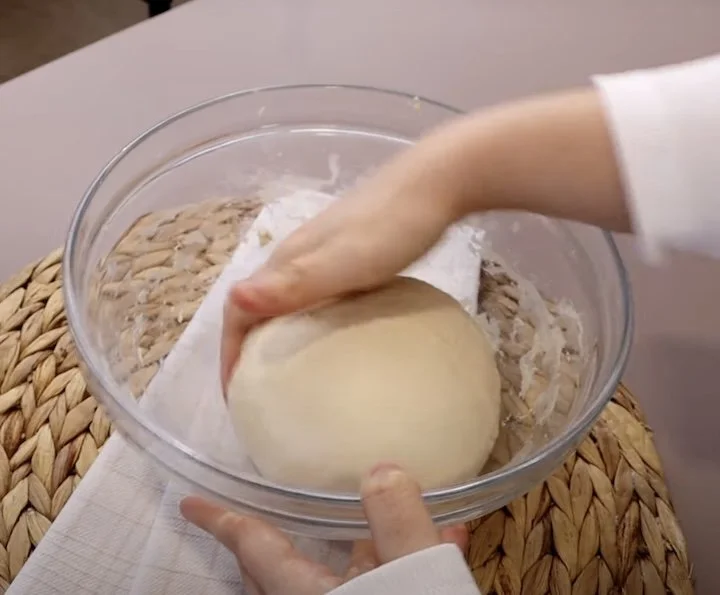
Let the dough rise
Remove the dough from the bowl, and using wet hands, shape the dough into a ball. Lightly grease the bowl with oil and place the dough back into the bowl. Cover with a damp kitchen towel or plastic wrap and allow the dough to rise for 2 to 3 hours at room temperature.
Method 2—No-Knead
Activate the yeast
In a small, microwave-safe bowl or measuring cup, combine the milk, water, and salt. Microwave until lukewarm, about 30 to 40 seconds.
Don't let it get hot—you’re looking for a temperature between 80°F and 100°F (27°C to 37°C). Stir in the yeast and allow to sit for 5 minutes.
Make a rough dough
Transfer the milk/water/yeast/salt mixture to a large bowl and add the flour. Using a fork, mix to form a rough shaggy dough. Once the rough dough has come together, wet one of your hands with water, and mix the dough by hand to make sure there are no spots of dry flour left.
Cover, and leave for 30 minutes to give a chance for the flour to hydrate.
Stretch and fold the dough
Perform a round of stretches and folds. Using a wet hand, lift one edge of the dough up, stretch it, and pull it to the opposite side of the dough (see photo below).

Stretching and folding the dough
Turn the bowl by a little less than a quarter turn, and repeat the stretch and fold. Do this five or six times until you’ve rotated the bowl once. You will notice the dough gets tight and doesn’t want to stretch so much as you get to the end of this round.
Ball up the dough (see photo). Then, cover and set aside for 20 minutes.
Balling up the dough after a round of stretches and folds
Repeat the stretch and fold process for another three rounds (to make four rounds in total), balling up the dough at the end of each round. Leaving 20 minutes in between each round.
Let the dough rise
After the four round of stretches and folds, cover the bowl with a damp kitchen towel or plastic wrap and allow the dough to rise for 1 to 2 hours at room temperature.
Both Methods
After the dough has risen using either Method 1 (Stand Mixer) or Method 2 (No-Knead) above, continue in the same way for the rest of the recipe.
Prepare the baking sheet
Dust a baking sheet with with either semolina or fine cornmeal. (I prefer to use semolina).

Dusting a baking sheet with semolina
Shape the muffins
Turn the dough out onto a lightly floured work surface and divide it into 6 equal portions. Shape the dough portions into balls and press them down.
Each muffin should be about 3 to 3½ inches (8-9cm) across, and about 1¼ inches (3cm) thick. Place the muffins onto the prepared baking sheet.
Allow the dough to rise again
Cover the muffins and allow to rise again for about
45 minutes.

The muffins after their second rise, ready to cook
Cook the muffins
Preheat a large skillet on a low heat for a few minutes. Add a tablespoon of butter, allow it to melt, and cook the muffins in batches for 5 or 6 minutes on each side. Add a little more butter each time you add a new batch of muffins to the pan.

Cooking the English muffins
Serve

The finished English muffins
Allow to cool for 10 minutes before serving. They're great split open and toasted.
Please note, if you’re finding that your muffins are coming out undercooked, it’s likely that you’re wanting your muffins to be a little thicker than I make mine. That’s no problem—please have a look at the “Troubleshooting” section above, for how to fix this easily by finishing cooking the muffins in an oven.
Watch the video for more tips on making English muffins


Hi! I’m Emma Fontanella. Here you’ll find trusted, tested recipes to satisfy your baking addiction and carb cravings. Learn more…
Tried one of my recipes? Please let me know on Instagram (@emmafontanella) or TikTok (@emma.fontanella)! Hashtag #emmafontanella
Search for another recipe…