
Easy Whole Wheat Bread | No Knead

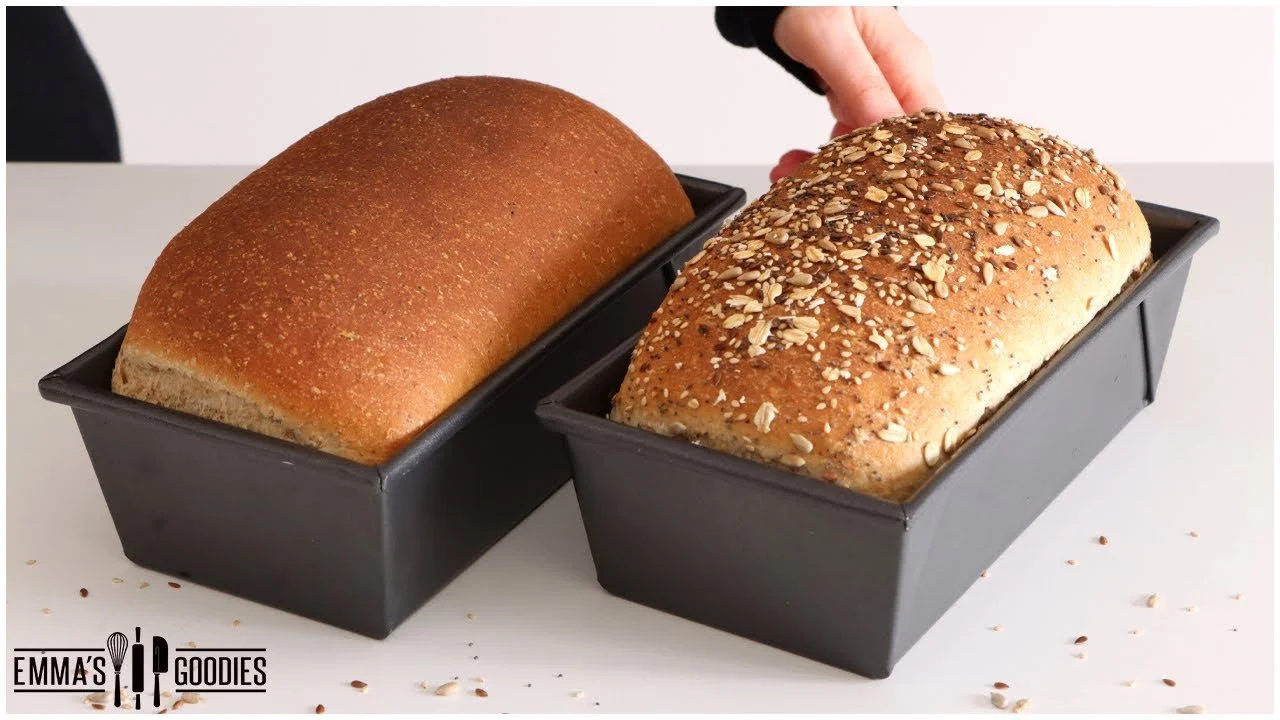
Emma Fontanella’s easy whole wheat bread. On the left, a regular loaf whole wheat bread. On the right, a seeded version.
About My Easy Whole Wheat Bread Recipe
This homemade whole wheat bread is not only delicious but it’s also packed full of nutrients. If you’ve struggled making whole wheat bread in the past, as I know many people have, don’t worry—this method is super easy and solves all the problems.
And, if you thought wholewheat bread can’t be as soft as regular white bread think again! This homemade version is just as soft and sliceable as regular white bread, maybe even softer.
If you like this bread recipe, you might enjoy some of the fantastic breads in my new cookbook, Simple Pleasures. These include easy rustic Italian bread, no-oven English muffins, amazing dinner rolls, party sharing breads, and even my mom’s special focaccia.

This whole wheat bread is soft and easy to slice. It makes amazing toast, and of course is great for sandwiches.
You can enjoy it with a little butter and jam, or load it up with all sorts of delicious toppings for breakfast or lunch.

A slice of Emma Fontanella’s whole wheat bread toasted and topped with cream cheese, smoked salmon and a soft-boiled egg.
Just like my homemade white sandwich bread, I’m going to show you two ways to make it. One that uses a stand mixer to knead the dough – it’s the ultimate no-fuss method. And then an easy no-knead method for anyone who doesn’t have a stand mixer. I’m also going to show you how you can incorporate different seeds into your dough.
Is homemade whole wheat bread healthy?
Homemade whole wheat bread is a much healthier option than supermarket white bread. As with all things, moderation is important. Think of a healthy portion as being one or two slices, as part of a balanced diet.
Why is making whole wheat bread more difficult than making white bread?
One of the biggest challenges when working with whole wheat flour is that it’s hard to develop gluten. We solve this by using a mix of whole wheat flour and high protein white flour. You see, whole wheat flour contains microscopic pieces of bran that are razor sharp.

The particles of bran in whole wheat flour are shown in the sieve. These are the cause of the challenges in making good whole wheat bread.
At the molecular level of gluten, they act like giant knives! In whole wheat flour, these bran fragments slice their way through the gluten, destroying it as fast as you develop it! The bran also competes for water in the dough, reducing the amount of gluten development.
By using a mix of flours, we alter the balance of gluten and bran. This fixes all the problems, making it much easier to develop gluten in the dough.

A slice of whole wheat bread made using a mixture of whole wheat and strong white bread flour. Using a mixture of flours like this completely solves all the problems traditionally associated with making whole wheat bread.
This makes it so much easier for beginner bread makers to get amazing results. You’ll get a dough that’s easier to work with, will rise really strongly, and is and much softer.
I recommend starting with a 50:50 mix, but you can play with the ratios and see what results you get. I also happen to think using a mix of flours leads to more delicious bread.
However, if you want to make bread using 100% whole wheat flour, I’ve given you some tips immediately below.
Can I make whole wheat bread using 100% whole wheat flour?
The short answer is yes, although you’ll need quite a bit more milk as whole wheat flour is so absorbent. The truth though, is it’s difficult to make good, soft bread using 100% whole wheat flour. The less refined nature of whole wheat flour often means you’ll get a bread that’s doesn’t rise as much, is darker, and is not as flexible.
So, you absolutely CAN use 100% whole wheat, but just be aware you will face challenges and you might really struggle to get the results you want.

A loaf made using 100% whole wheat flour. Follow Method 1 (the stand-mixer method). Just be aware that it’s more difficult to make the loaf using just whole wheat flour. If you’re a beginner, I recommend using the mix of flours in the main recipe.
If you want to have a go at using 100% whole wheat flour, here are my top tips:
Make the dough using a stand mixer to maximize the gluten formation. There's no real way to get good results making it by hand.
Knead the dough in the stand mixer for 10 minutes. Again, this is to maximize gluten formation.
Opt for a whole wheat flour that has high protein. I wouldn't go below 11%.
Be aware that a 100% whole wheat bread won't remain as soft as doing a 50 50 mix. The crumb will be denser and it won't be as shelf stable.
Bake the same day. If you do an overnight cold fermentation, you will end up with a very dense loaf because the bran competes with the gluten for water. Overnight, you will find the gluten is much reduced, leading to reduced rise.
YIELD
One loaf of white sandwich bread.
EQUIPMENT
An 8.5 x 4.5 inch (21 x 11cm) loaf pan
A stand mixer for Method 1 (not required for Method 2).
INGREDIENTS
1 cup + 3 tbsp (280g) lukewarm milk. That is somewhere between 80°F and 100°F (27°C to 37°C).
3 tbsp (45g) olive oil
2 tbsp (30g) honey
2 tsp (7g) yeast
1 tsp (5g) salt
1½ cups (210g) strong bread flour 13% protein
1½ cups (210g) whole wheat flour
INSTRUCTIONS
Make the dough
Prepare the dough using your choice of either Method 1 (Stand Mixer) or Method 2 (No-Knead). Both will give you exactly the same results, so pick the method that suits you best. The quantities of ingredients in the recipe make one loaf.
In Method 2, I show you how to incorporate seeds into the dough. You can use this approach with Method 1 too.
Method 1 (Stand Mixer)
Warm the milk in the microwave. The milk along with other ingredients will yield a softer crumb. To the warm milk, add the salt and the oil.
You might notice that we’re using more olive oil in this recipe than in my white sandwich bread. That’s because the oil has more work to do to keep this bread soft and flexible, due to the hard external parts of the grain used to make whole wheat flour.
After adding the oil, add the honey. You might be familiar with trick but if you aren’t, the residual oil on the spoon lets the honey slide right off the spoon! It won’t stick and like magic you’ll have a clean spoon. So, oil first. Then, honey.
I like to use honey rather than sugar in whole wheat breads, but it’s up to you. You won’t taste it, however it helps keep the bread fresh for days.
Combine everything together, along with the yeast.
Into the bowl of a stand mixer add the two bread flours and the liquids. Mix the ingredients on medium speed until the dough comes together. Then increase the speed to high and knead for another 5 minutes.
If the dough looks dry don’t be afraid to add an extra tbsp of milk. (Different flours, absorb liquids differently, and this is especially true for whole wheat flours.)

The dough pulling away from the sides of the bowl
The dough should pull away from the sides of the bowl and feel tacky. Grease your bowl, grease your hands, and shape the dough into a ball.
Cover the dough and set aside to rise for around 2 hours until it’s tripled in size. Now, skip to the section “Make The Bread” below.
Method 2 (No-Knead)
Use this no-knead method if you don’t have a mixer and you don’t want to be bothered to knead dough by hand.
In a bowl combine warm milk, salt, oil, honey and yeast (see Method 1, above for more details).
Optionally Add Seeds

Adding the seeds to the liquids is the easiest way to ensure the seeds are evenly distributed throughout the dough.
I love seeded bread. You can find small bags of seeds in many supermarkets. They quite inexpensive. One of the best ways to incorporate the seeds is to add them to the liquid. This helps disperse them easily throughout the dough.
I prefer using small seeds inside the dough, and save the bigger grains and seeds to scatter on the bread as a topping. But there are no rules here. You can experiment with what seeds you like to add into liquid.
Add the flours and form a rough dough
Give the ingredients a mix and add the whole wheat bread flour along with the white bread flour.
Mix everything together with a fork, until it forms a rough, shaggy dough. As the dough comes together, you’ll have to switch to using your hands because the mixture will become stiffer! Wet your hands with water, and continue mixing, making sure there are no dry patches of flour and dough.
Using your hands makes it easy to ensure you don’t miss any dry patches of flour. Cover the dough, and let it rest for 30 minutes to allow the flour to continue to hydrate.

Stretching and folding the dough
After 30 minutes, we’re going to perform the first series of stretches and folds to start to develop the gluten in the dough.
Wet your hand and stretch and fold the dough onto itself, turning the bowl one quarter, as we go. Do about 3 to 4 folds. Then take your wet hand, and push the dough under itself, creating a rounded ball.
This method allows you to develop gluten in the dough. Cover the dough and come back every 30 minutes to perform more stretches and folds.
Perform a total of four rounds of stretches and folds. After the last series, allow the dough to rise for about 1h or until it’s tripled in size. Cover the bowl and set aside. The exact timing will depend on how warm your kitchen is.
Once the dough has tripled in size, we’re ready to make the bread.
Make the bread
Prepare the loaf pan
Generously butter, your loaf pan and line the bottom with parchment paper.
Shape the loaf

Rolling out the dough
Transfer the dough onto your lightly floured, clean work surface and using your pan as a guide we’re going to roll out this dough using a rolling pin into a rectangle.
This smooth surface is going to be the outside of the bread. Flip it over, using the rolling pin smooth out the other side, and starting from one of the ends roll up the bread into a sausage shape. Tuck the ends in.

Shaping the loaf.
Final proofing
Place the roll in pan, seam side down. I like to gently press down the dough to ensure an even rise.

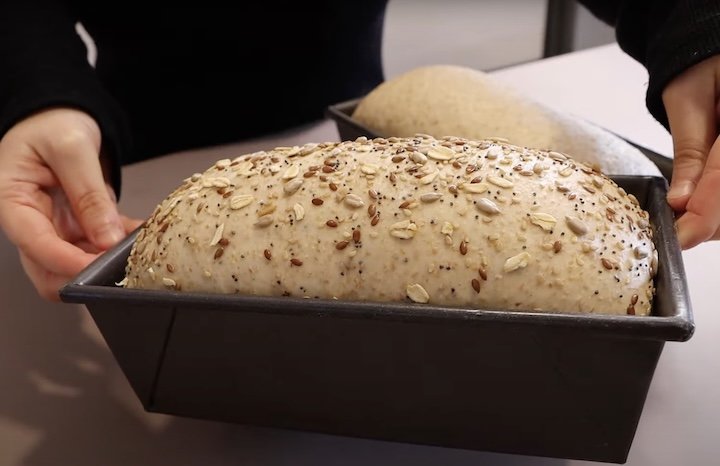
Shaped loaves in their tins, ready for final proofing. I’m showing you both options here: the seeded loaf (left), and the unseeded regular version (right).
Loosely cover the breads and allow to rise for about one hour or until the dough has risen above the top of your loaf pan. This is critical for achieving the iconic sandwich bread shape. Again, this will depend on the temperature of your kitchen.
If you’re making a seeded loaf, gently scatter your toppings onto the bread.
The proofed loaf, ready for baking. Notice how the dough has risen well above the sides of the loaf pan.
Bake the bread
Bake the bread in a preheated oven at 350°F (180°C). It will take around 30 minutes. It takes longer to bake than white bread because of the higher liquid content, and because it’s a little denser in structure. This means it’s harder for steam to circulate inside the loaf as it bakes.
You don’t want to underbake this loaf, but try not over bake this bread either or it will dry out. Don’t let it get too dark on top, but don’t take it out when it’s too pale, either! If you notice the bread is getting really dark, cover the top with foil slow down the browning.

The baked bread, right out of the oven. I’ve shown you both options here, the unseeded and seeded versions. The unseeded loaf (left) has had the crust buttered.
While the bread is still hot, I like to butter the top. This is optional, but it does give the crust the most amazing flavor.
As soon as the bread comes out of the oven, carefully remove it from the loaf tin, and let it sit on a wire rack so the bottom and sides don’t become soggy.
Allow to cool completely

Slice the bread when it has cooled completely
I know it may be tempting to cut a slice right now, but you’ll end up with a gummy loaf of bread. This has to cool for at least 1 hour, before you cut into it.
This bread is incredible. Perfect for any sandwich and for toast. The bread will keep for about a week, if stored correctly.
Store the bread at room temperature in a ziptop bag or you can even pre-slice it if you want and freeze it. Then just take out the slices you want and toast them from frozen. This bread will keep frozen for a month or two
Watch the video for more tips

Hi! I’m Emma Fontanella. Here you’ll find trusted, tested recipes to satisfy your baking addiction and carb cravings. Learn more…
Tried one of my recipes? Please let me know on Instagram (@emmafontanella) or TikTok (@emma.fontanella)! Hashtag #emmafontanella
Search for another recipe…